|
|
Creating a doll costume
from a picture
by Lee Menconi-Steiger
|
|
|
1. assemble pictures and research
materials
This tutorial takes you through
each step
|
|
Unless the picture is a fashion illustration showing the front, back, and details, see if you can find pictures from the same era that illustrate similar costumes from various angles. Better still, find actual vintage garments to study. This will give you an understanding of the basic outlines that were la mode, and will help you figure out what hidden portions of the costume should look like. |
Look for additional costume pictures at your local library or bookstore,
or check out these online resources: The
Costumer's Manifesto, Google's
image search, and the "History
of Costume" (also available in black and
white from Dover Books as "Historic Costume in Pictures." )
Visit local museums and ask about their textile collections. There's nothing like seeing the real thing to understand how it was made. Also get a book on pattern drafting; this will give you shapes of basic pattern pieces and explain how to alter them for various purposes. |
 |
I've selected this gown from Spring 1882 to work with, from "Victorian Fashions and Costumes from Harpers Bazar 1867-1898," part of the Dover Pictorial Archive Series. This feminine gown combines vertical lines and sweeping curves to create an elegant tall, narrow silhouette with a relatively small bustle enhanced by draperies. A small frilled collar, ruffled jabot, and a swallowtail pelarine (capelet) make up the neckline. The bodice ends in petal points that fit over the skirt in front and back. There is no waist seam, so these points are going to make the bodice pattern a bit more difficult. The underskirt is box pleated at waist and knee and trimmed with something--lace? silk flowers? scrunched silk? at the knee. The bustle drape looks pretty tricky; the center back of the topmost layer appears to be cut in one piece with the lowest layer, and there's that interesting bit of what looks like bead-fringed black velvet separating top and bottom. |
|
This bodice looks like a silk taffeta with woven or appliquéd stripes. The bustle/overskirt is a crisp, lightweight silk, and the underskirt a heavier fabric with some body to it. |
Effect vs. Copy |
Julia from Darleen's Dolls |
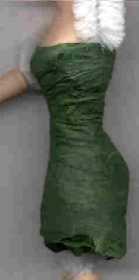
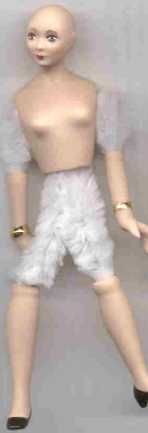
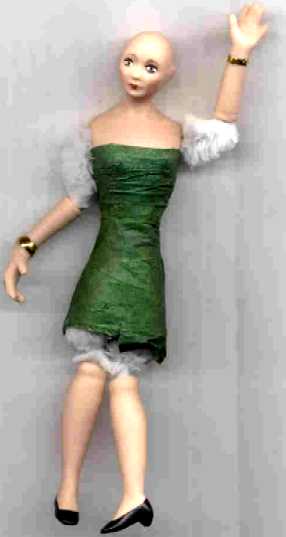
Since we're creating a form-fitting garment, we'll need a body to fit it on. If your doll doesn't have a full porcelain torso, it's time to fill in the gaps. Sculpt the missing parts in oven-bake or air-dry clay (beginner-level sculpture is OK here--it'll be covered with clothes--but try for symmetry) or pad out the doll's wire armature with stuffing and wrap with thread, fabric, or tape. It's easier to glue to a hard clay form, while a soft form can be more easily adjusted to fit sewn clothing. The illustrations are padded with stuffing, then wrapped in tape. The wax in floral tape may stain cloth; use the thin, white tape used for bandaging (I couldn't find it today) (found it later and covered the green). Extend the body at least as far as the fitted portion of your planned costume and shape it to match your picture. A Victorian woman would be wearing a corset, and her body would have a fairly smooth line, while a modern woman wearing a bra juts out abruptly at the bust. You can even alter a full porcelain body with clay or padding to give it the desired line. I've wrapped her bust with tape and padded her hips with polyfil stuffing held in place with LOTS of tape. Use a slender rod/pencil to shove stuffing up into the taped area. |
|
|
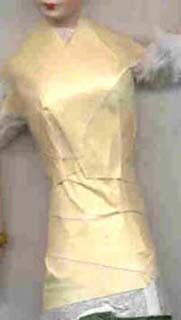
Wrap the doll's body in a single layer of paper towel (or in this case a paper napkin from the Chinese restaurant down the street) cut to approximately the size of the doll's torso. Cut slits for the arms (if they're already attached) and tape the opening together. Illustration D Trim off excess towel and tape the shoulders closed. Use bandage tape, masking tape, or other fairly flexible tape. A narrow tape is easier to use. Now wrap tape firmly around the torso, so the towel is snug against the form. The tape will have wrinkles in it, just mash them as flat as possible. The entire towel should be covered with tape and be fairly smooth around
the body.
|
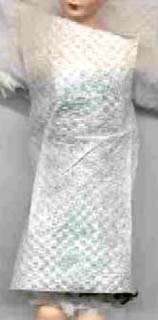
Illustration D
|
 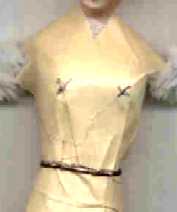
Illustration F |
Tie a thread around the smallest part of the doll's waist, then mark
it with pen on the bodice. Draw a line up center front and one up center
back, and mark each breast point (the spot where the breast sticks out
farthest from the torso, where the nipple is usually expected to be) with
an x. Illustration
F
Next you need to figure out where the seamlines will fall. |
|
Princess line clothing moves the bust dart to the armhole and joins it to the waist dart in a smooth curve. Usually the center front is cut on a fold, there are two side fronts; and a flat back or a princess back with two side backs and one or two center backs |
 |
 |
Corsets smooth out the transition from waist to bust, so clothing generally
needs no darts, using seams running from shoulder and armhole to waist.
Full-size bodices might be made in 4, 5, 6, or more pieces . Illustration
H
In miniature, that would give you all seams and no fabric. Fortunately, most of these can be reduced to just 2-4 pieces, and trim applied if you wish to give the illusion of more seams. |
| Look at your picture to see where seam and dart lines fall on the bodice.
From the shape of this bodice, you'll see that seams are needed at center front and back to allow the bodice to widen and flow over the bustle. Based on the fit of the bodice, the way the stripes curve, and the way that little bit of satin on the side is puckered, I've drawn in my guess of where the actual seamlines fall--a total of ten pieces in the bodice (4 in front, 2 sides, 4 in back). AAAARRRGGGHHH! Two bodice pieces--left and right sides with center front and back seams--plus waist darts should give the same effect. |
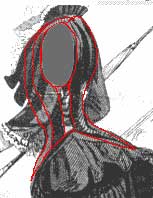 |
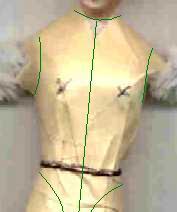
Illustration I--seams marked |
I've marked neck, arm, and seamlines on the basic bodice, and added
markings for the peplum. Illustration I
Use small, sharp scissors to cut the bodice off the body along seam lines. In this case, I'll cut center front and shoulder seams to remove the pattern, then cut the neck and armholes. I'll leave the peplum area below the waist intact so I can fit it over the bustle later. |
|
Cut the bodice so it lies flat. The usual way is to make a cut straight up from the bodice bottom to about 1/16" short of the breast point (the waist dart). If necessary, make a second cut straight across from side seam to 1/16" shy of the breast point (the bust dart). If the back doesn't lie flat, cut waist darts extending about 1/4 to 1/3 up the back. (If the bodice pieces still don't lie flat, mash them with a warm iron.) Illustration J
shows half of the tape-and-paper-towel bodice removed from doll.
I've cut it apart along center front and back, cut a waist dart, and opened
the side seam from bottom to waist mark so the pattern lies flat.
The skinny part on the right that kind of looks like an arm is center front.
|
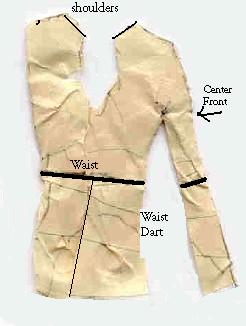
Illustration J |
|
Add ease and seam allowance If you don't want the bodice to be skin tight (especially if you're sewing it on), add about 1/4" or so around the body, split up among 2 or more pattern pieces (i.e., 1/16" to each side of the center front and center back). Don't change the size of the neckline when adding ease. Now add an additional 1/8 to 1/4" for seam allowance (more if you're sewing or new at this, less if you're gluing) to the seam edges of each pattern piece. |
Illustration K |
|
Now take a deep breath and lay your adjusted pattern on the final fabric. Think about where any design in the fabric should fall; a floral motif or stripes should be centered front and back; avoid centering designs directly over the breast points. If necessary, plan to match the design across seams. Cut out the fabric and mark darts. Stitch or glue in darts and seams. Fit to doll and stitch or glue in place. I usually apply the bodice to the doll before adding the sleeves, and tuck the extra fabric in the armhole (armscye) between the torso and arm. |
Underpinnings
Bustles, hoop skirts and petticoats, however, create the shape of the skirt and must be included--or at least faked. |
Illustration L |
|
|
Illustration M |
Some skirts are made of a simple rectangle of fabric gathered or pleated at the waist. Other skirts might be much wider at bottom than at top, a good way to minimize bulk at the waist. Gores--pie-wedge shaped pieces of fabric--can be assembled to make a partial-circle skirt. Cut the center line of each gore on the bias for extra cling and drapability. Illustration M, top. Or use a full or partial circle of fabric for the skirt. Cut the center front of the skirt on straight grain for best hang. Illustration M, bottom. |
||
|
|||
|
I think I figured out the bustle; the entire thing is a rectangle; parts of each side are gathered onto flat velvet hip pieces with curved fronts, leaving center back loose. The flat fabric is brought up high under the top of the bustle, letting the side fabric pouf out over it, and making the center back contort itself into that odd peak on her derriere. Or maybe not, I'll have to try it. |
the bustle the bustle pattern |
||
|
I'm lucky to have a description to go with my picture which says the gown is made in bronze silk, with matching moiré stripe and velvet. I'm starting with silk fabrics of solid beige, fine golden stripes, 1/4" wide charcoal and white stripes. Sound like an awful mess of fabrics? I've dipped them all in various combinations of pumpkin, brown, and teal dye and they're now a nice palette of coppery browns. |
||
|
Now go to part 2, From Pattern to Costume |
|||
|
The Costumer's Manifesto
|
||
|
|
Home |
questions, & suggestions! |