The Making of a Musketeer |
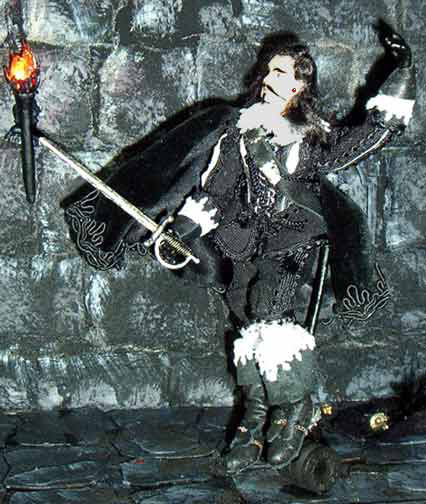
April 6, 2003 |
The Making of a Musketeer |
April 6, 2003 |
| I started by looking through costume books to figure out
what he should wear. I want him almost all in black, with bits of white
and silver, and a just tiny touch of red; a ruby on his sword hilt, perhaps.
I also got out my videos of the Three and Four Musketeers filmed
in the 1970s. They were badly filmed off the TV, so I treated myself to
brand-new tapes, and added Return of the Musketeers made with mostly
the same cast 20 years later, and which I'd never seen. It's important
to have good research material!
Athos isn't a dandy, so I'll save the elaborate slashing, pinking and puffing so popular in the early 17th century in case I ever make his friend Porthos, limiting myself to a few simple white puffs on the body of the doublet. I've collected several black fabrics: plain wool, smooth worsted wool, rayon, silk, very fine corduroy, leather (and its suede-like back), velvet, velveteen, and velour. I've got thin cotton and silk in off-white (and somewhere some old hankies, too), a selection of small trims in black and silver, and various sizes of no-hole beads in silver and black for buttons and jewelry. |
||
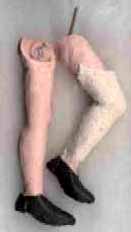
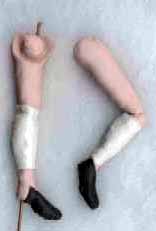
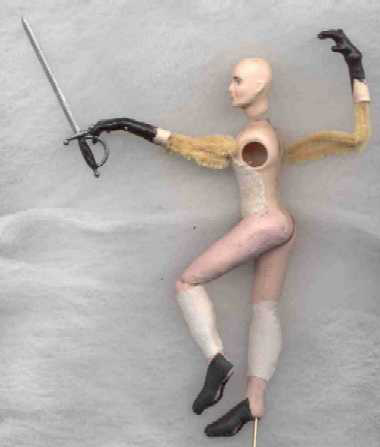
| August 30th, 2002. Problem #1: the doll I chose had flat feet,
and I wanted him to wear high-heeled boots. After consulting with the MSAT
Mini Dolls list, I sculpted new legs for him. That let me give him one
bent leg, too, so he can stand with one foot up on something.
I used stiff wire (welding rod) wrapped with foil as "bones," and sheets of Sculpey (rolled out on a pasta machine) to build up his flesh and skin. (Back in the days when men rode horses and wore tights or snug trousers, a well-developed calf was highly desirable. Pads filled with sawdust were employed by those with skinny legs.) It wasn't until I scanned him and was cropping the pictures that I noticed these legs are really quite beefy. I think they'll be fine; his cannons (breeches) will be loose fitting and his bucket boots will cover most of the rest of his legs. If the legs still look too heavy later, I'll trim them. Sept. 8. I worked on his hose and boots. Once his feet were covered with black leather, they looked ENORMOUS! So he's going to get new legs--next weekend. And I think I'll give them knee joints so I can figure out later what he's standing on--I think it's going to be a square stone as part of a torchlit alley scene. (I'll save the beefy legs for that possible Porthos doll--he was a pretty big guy.) |
 |
|
| Sept. 12. Resculpted legs. They're more slender,
and I made the bent leg posable by leaving a slight gap at the knee. I
also added a second wire in the straight leg that can be dropped into a
hole drilled in the floor of the scene and hold the doll upright without
a stand. Planning ahead!
Sept. 14. AAAAARRRRRRGGGGGGGGHHHHHHHH!!!!!. I baked the legs
at 275 for 15 minutes, but they were still very soft. An hour later, after
checking at 10 minute intervals and easing the temperature up each time,
the legs were still squishy-soft. In exasperation, I removed the foil tent.
Ten minutes later, I pulled out puffy, chocolate-brown monstrosities. They
kind of look like they're dancing; I may make a happy fat lady with them.
|
 |
|
| I took the clay and wire and foil etc. out to the living room and watched
Lord of the Rings (good adaptation of the book, but I was sorry Tom Bombadil
got cut). The legs were sculpted by the time the Fellowship left Lorien.
With all this practice, they're getting easier and better. The feet, especially,
came out really nice. I made them rather small so they would look right
when covered with leather.
Sept. 15. The legs baked sucessfully this time! Here they are with stockings and the beginnings of his boots. |
 |
|
|
(at least for now--do you get the impression I'm a closet perfectionist?) |
| Problem #2: Do I want him to be holding his
sword? That might mean sculpting new arms, since these are too straight
and the hands too flat...
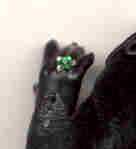
Sept. 7. I decided to give him largish female hands that had a good pose to hold a sword, and painted them black to simulate leather gloves. They end at the elbow, so his arms will be posable. The hands are still a little small, so I'm going to try flocking them and give him suede gloves instead of leather. Just as soon as I find the black flocking. Sept. 8. Still no flocking. I should just order some. Sept. 15. Flocking still AWOL, so I dipped the gloves in matte Mod Podge and repainted when dry. That's big enough--I don't want to lose the nice expression in the fingers. I added the emerald ring that's been in his family for generations--a wonderful triangular rhinestone from minikitz.com. Boromir (a character in Lord of the Rings) had really cool gauntlets, I'll adapt that design for Athos. I won't attach the arms until after the doublet is on--they'd just get in the way. |
  |
|
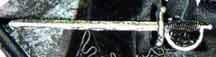
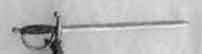
He can't be a musketeer without a sword--this is one of those plastic
ones used for fruit garnish in cocktails. I thought of making him a metal
sword (I did one for Zorro), but the plastic one is the right size, has
nice detail, and I like the hilt. It might get that ruby in the pommel
later. He'll be thrusting with the sword in his right hand, with the left
hand raised above his head for balance. En garde!
October 12 I silver-leafed sword using one of those bonded faux leaf kits. Very shiny and metallic and easy to do, too. |
| back to Sept. 15. Do his feet still look too big?
Hard to tell with the arms all funky and the head floating above his shoulders
like that (since he was originally an all-porcelain doll, his legs and
head were strung together with elastic, so the head fell off when I removed
his legs. I'll glue it back on after his doublet is finished).
Gave him silk stockings from knee to ankle (boots and breeches will cover the rest of his leg) and applied the vamps for his boots. |
 |
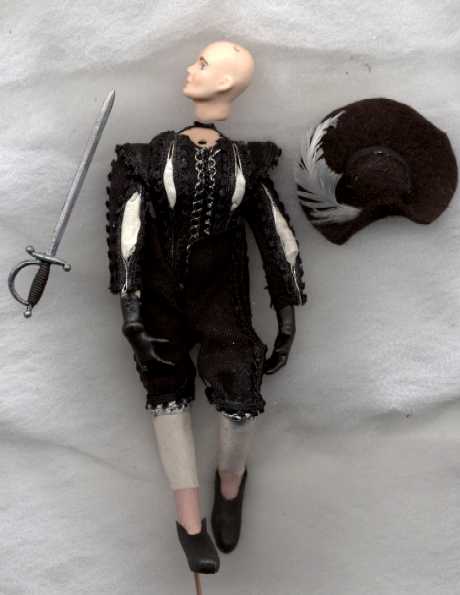
| September 22. He's finally starting to look like a musketeer!
This weekend, I crafted his doublet, breeches and hat. I've used nearly
2 yards of black picot trim on his costume, almost none of which shows
in the pictures (that's the problem with black on black). There are 14
vertical rows of the black picot on his doublet and four on each sleeve
(one row on each side of the white puffs), plus two on each leg of the
breeches. I haven't even started his peplum!
His arms and legs (and head, obviously) still aren't attached; I'll do his boots, boot hose, cuffs, and gauntlets first. What's left after that? Baldrick, scabbard, collar, maybe a purse; cape (I'm looking for another good black trim for the cape; I don't think I can stand much more picot!) hair for head and face. Oh, and a scene to display him in... Think he'll be done next week? |
 |
| September 23. I managed to decorate his peplum with a
minimum of picot. I also discovered that the "worsted wool" I was using
for his clothes isn't wool at all--it's 100% silk. I did my shopping for
black wool at the thrift store by fondling the men's slacks (on a rack),
and this pair was so soft and supple, I didn't even look at the label until
today.
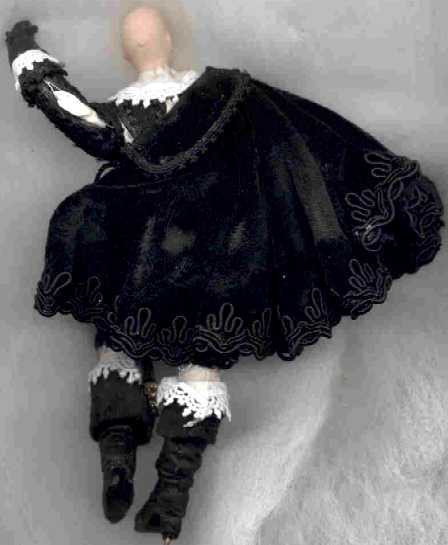
I got started on his cape; it's a full circle slit to the center. Velveteen lined with silk charmeuse--both black, of course. I tried doing some designs on scrap velveteen with glue and no-hole beads, but they're too glittery. I don't think flocking (if I could find it) would show against the velveteen. Trimming the hem with something with a little weight to it would make the cape hang better. Any suggestions? |
| Embossing velvet with rubber stamps
Place the velvet face down on a rubber stamp (a stamp design with lots of open space works better than one with an intricate pattern). Press hard with a dry iron set for the proper fabric type (i.e., cotton for velveteen, rayon for rayon velvet). Move the iron slightly in all directions without disturbing the fabric against the stamp and press hard again (otherwise you'll have gaps from the steam holes). Let cool. If you don't like the design, lightly spray with water and hold the hot iron above the velvet to heat (or steam heavily) and use a stiff paintbrush in a spiral motion to fluff up the pile (this probably works best on natural fibers and not so well on synthetics). Re pressing the design seems to work well, too. |
September 28. I decided to try embossing the velveteen
of the cape. A trip to Joann's (Michaels is in the next county) found
only a few rubber stamps, and I wound up getting a set of Celtic stamps
for $10. The test came out pretty good, but doing multiples on the
cape is a problem because steaming each new section makes the previous
sections sort of fade. I'll try using a dry iron and see if that
solves the problem. {next day: Yep, dry worked better than
steam!}
I followed Joleen's suggestion of putting a wire in the hem of the cape so folds would stay the way they're arranged. I also got more black trim at Joann's, but it all seems out of scale. Maybe he doesn't need a cape... |
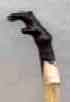
| Boots
I cut up an old leather jacket to make the boots; usually the under part of the two-piece sleeve is made of softer, thinner leather than the rest of the jacket. Stretch and twist the leather to make it more supple. You can dampen the leather (rubbing alcohol works well) to make it stretch over the foot better; I just use extra tacky glue. Athos' boots are made in 5 pieces: the front of the foot--called the vamp--was applied first, then the leg part of the boot (I bet there's a better name for that), which overlaps the vamp in front. Next comes the heel of the upper. The leather of the vamp and upper heel that extends below the bottom of the doll's foot is notched and glued to the sole of the foot. The sole is glued on and trimmed to fit, and the Fimo heel is glued on. The boots could be pulled up to reach his thighs, but I've scrunched them down around his ankles, and turned the tops down so they come to just below the knee. His boot hose match his shirt cuffs--white linen with white lace. Boot hose were worn under the boots to protect the silk stockings. |
 |
| He's now got doublet cuffs trimmed with more picot; over them are linen
shirt cuffs trimmed with lace; on top of that are his leather gauntlets.
I staggered the wrist edge of each layer to keep a smooth line.
And I glued his arms on! I used Quick Grab for a very important reason: I could find it. If his arms fall off, I'll dig deeper in the pile to find the silicone glue. |
|
| September 29. His legs are glued on, breeches finished,
and peplum in place.
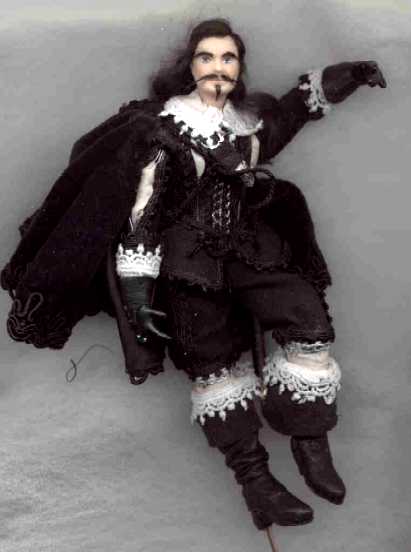
In this era, the breeches were tied onto the doublet at the waist with cords called "points" that passed through eyelets in the waists of the breeches and doublet. The row of rosettes or ribbons you sometimes see around the doublet waist in this era are fancy versions of the simple shoestring-style bunka bows I gave Athos. The fly of the breeches was held closed with a similar tie, and sometimes decorated with ribbon loops. Return of the Musketeers gave me some good ideas for his baldrick--it got a big silver buckle cut from a jewelry finding, and the strap end finished with a silver tip. Once his head was glued on, I added a broad white collar and decided just to go with the cape the way it was. Joleen was right on about the wire--it controls the folds perfectly while giving them a sense of movement. With the cape ties (more bunka) in place, his clothes are done! |
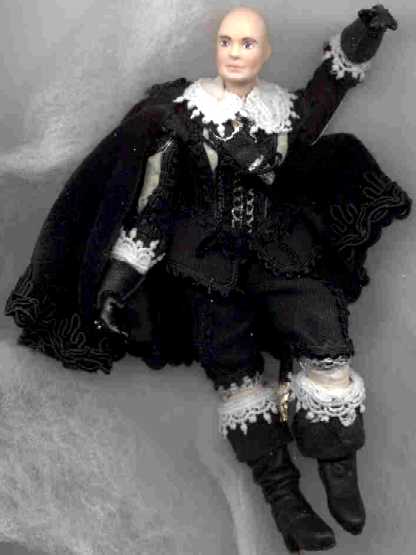 |
 |
The scabbard is black-painted florists tape wrapped around the blade of a spare sword. I cut tip and bindings from a bit of embossed metal that used to support a sea shell earring; the scabbard now looks like leather bound in silver. After the paint and glue dried, I cut off the sword hilt and glued the scabbard to the baldrick. |
 |
Sept. 30 What a productive lunch hour! He looks much better
with hair. I was clever enough to bring a needle tool; wish I'd also brought
tweezers and tiny scissors. His eyebrows need trimming and my desk scissors
are too big. (Does he look like Burt Reynolds to you? Not my intention...)
Still to be done:
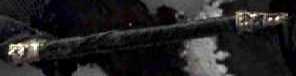
His eyes seem too "starey"; I wonder if I can paint eyelids. Maybe just a wash over them. D'ya think he needs an earring? Yes, a RUBY earring! There's my "touch of red!" And I forgot about his spurs! Worked on them at the mini meeting last night. And for his display: I recently got a wide, shallow case with acrylic on three sides that would hold a street scene-- cobblestones, an arched door in a stone wall, all lit by a torch. The case is so wide, I'll need a second doll in there, so perhaps Porthos will be born after all. There might even be room for all three musketeers... All for one and one for all! No, not all three--Aramis always wears black, too, and I'll say it now: whoever my next doll turns out to be, he (or she) won't be wearing black! October 10. I've started his setting! |
|
April 6, 2003 DONE AT LAST!
He's finally done, right down to his spurs, and now lives in his special setting; check it out at: |
|
|
|
|