Supplies:
Acrylic paint: Cobalt Blue, White,
Golden Yellow, Brown
Tacky white glue
Xacto knife
Paint brushes
Fine sand paper
Plain paper
Scissors
Pencil
Ruler
Paper towels
If using metal or plastic charms: dish soap, white
vinegar, hot water |
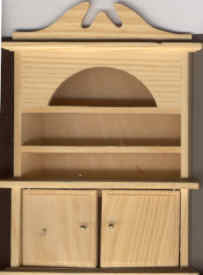
Bashing
Use a flat screwdriver or similar tool
to remove any "accessories" glued to the
shelves. Keep them for another project.
Use pliers to remove the second shelf
and the crest, if any, on top of the hutch.
Re-cut the arched opening:
cut a piece of paper the same size as the arched section
of the hutch. Measure and mark the center of the top of
the arch, and about 1/2" in from both sides at the
base of the arch.
Draw a smooth curve from one base mark
to the top mark. Fold the paper in half at the center
line, and cut through both layers of paper along the
curve. Open the paper and lay it against the hutch to see
if you like it. If you don't, then start at a) again. If
you do, then use the paper pattern to draw the new curve
onto the hutch.
Cut the new curve with the Xacto knife.
Several shallow cuts are easier than trying to make one
perfect cut. Sand the curve, top, shelves, and any other
rough spots.
|
The
Hutch
Brush plain water over all outside
surfaces of the hutch, including the top, sides, back,
bottom, outside of the doors, front edges and fronts of
the shelves.
Thin some of the blue paint with water.
Brush this over the wet hutch, allowing the paint to soak
into the wood, staining it an even dark blue with the
wood grain showing through. Don't worry too much about
getting paint on the inside, you'll use an opaque
technique there. Paint the four wooden beads to match,
sanding first if they have a shiny finish. Paint the door
knobs with straight blue paint. Let everything dry; touch
up if necessary and dry again.
Mix a few drops of blue paint into
about a tablespoon of white paint. Mix well; add more
white or blue to create a pretty sky blue. Squeeze out a
blob of plain white paint so it's handy.
Paint the shelf and insides of arched
shelf opening sky blue, keeping paint off the dark blue
exterior. While the sky blue paint is still wet, lay the
hutch on its back and use a clean brush and a little
white paint to create fluffy clouds on the back wall. If
you haven't done this before, practice first on paper;
use just a little white paint on the brush, and dab
straight down into the blue. Make three or four dabs
together for each cloud. Paint the second shelf opening
and inside the cabinet (including the insides of the
doors) the same way, but paint the shelves dark blue. (It
just looked better that way.)
|
The
Charms
Wash plastic or metal charms in hot
soapy water and rinse well. Soak them for a few minutes
in vinegar. Rinse with plain water and pat dry. This gets
any oils off the charms and makes the paint stick better.
Mix two drops of tacky glue (also makes
paint stick better) with about a teaspoon of yellow
paint. Paint the front and sides of all charms with a
thin coat of this mixture, making sure it doesn't clog up
the design. Let dry; touch up if necessary and dry again.
Thin a bit of the brown paint with
water. Apply to each charm, allowing the color to run
into the design. Use a bit of paper towel to remove the
brown from the high points of the design (nose, brow, sun
rays). Let dry.
|
Finishing
Lay the hutch on its back. Glue a small
moon charm in each upper corner of the arched front. If
using crescent moons, have them face each other. Glue a
sun charm on each cupboard door. Let glue dry.
Sand one end of each bead flat. Glue
the flat side of one bead to each corner of the bottom of
the hutch, making little round feet (those hutches are
always a little short for my taste). Stand hutch up on
legs. Let glue dry; if feet aren't level, rub all four
feet at once against a sheet of sandpaper on a flat
surface. Rub a couple of times, then check for level, rub
again if needed. When satisfied, touch up paint on feet
and let dry.
Glue a line of bunka inside the arch
and around each cupboard door. Wrap and glue bunka around
sides and front of hutch 1) just below the wide top
piece, 2) along the top shelf, and 3) just above the wide
piece that forms the second shelf. Glue a short piece of
bunka along each side just above the wide base piece that
forms the bottom shelf of the cupboard.
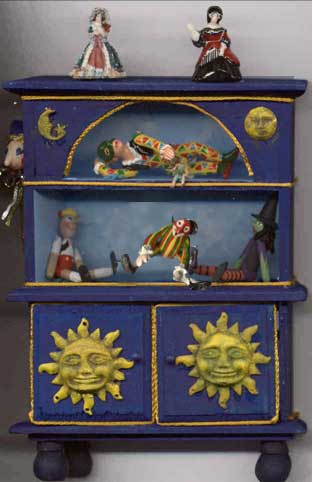
Fill cabinet with a tiny collection. I
use mine to display brightly-colored toys, propping the
cupboard doors open to reveal a castle and toy soldiers.
|
|
| |
Resources
Michael's Crafts (and other) stores
carry this and other styles of unpainted hutches for a
dollar or two. I think I got this particular one at a
discount store.
Minikitz.com
offers two sizes of suns nearly
identical to the ones I used on the cupboard doors in
their "outdoors" section.
Bunka is also known as chainette, and
is used to make fringe and tassels. I recycled a
graduation tassel for this project.
These moon charms are available
wholesale only from Rings &
Things. You must have a resale
license to order.
I'm sure they're available elsewhere, too; if you find
something similar, please let me know and I'll post it
here.
|
Toys
The witch and Pinocchio puppets are
taught on a video, I'll try to find out whose.
The 3/8" tall soldiers drilling
inside the cabinet are made from the tops of fancy turned
toothpicks. I wouldn't want to make these myself (too
much tiny detail), but if you want to try, I'd advise
painting the soldiers on a whole toothpick, then cutting
off the excess. They have a bit of black on top for hair
or hats, bare wood faces, red coats with white
"crossed belts" painted on the front, and blue
trousers. They even have tiny black dots for eyes. I
really admire the ingenuity, patience and eyesight of
whoever made these!
The jester stick has a Sculpey head,
felt hat, bead collar, toothpick handle, and bunka
streamers.
The tiny fairy atop the hutch is an
itsy-bitsy scale figure from a railroad hobby shop.
Painted flesh and clothing, a tiny bit of feather for
hair, and acetate wings.
|

