|
|
|
|
| Look at your picture while working! I always get
into trouble when I think I know what it's supposed to look like and remember
it wrong.
Think out your fabrics and trimmings, then buy or dye enough for everything you're doing, plus a little extra for mistakes. Re-think or re-cut a pattern piece if it isn't working. (I re-cut the bodice and added more to the bustle.) Trying to make a miscut piece look right takes more time and frustration than recutting. While the Victorians might have used a different trim on each part of the costume, modern eyes usually prefer some repetition. I used the same ecru lace on skirt and bodice, black bunka all over everything, and no-hole beads on hips and lapels. |
plan out each step:
|
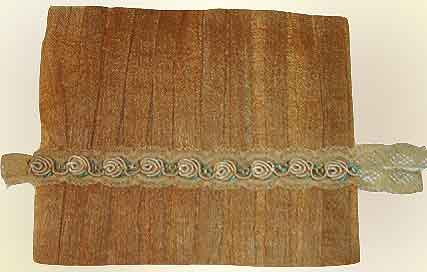 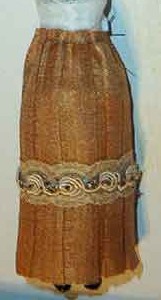 |
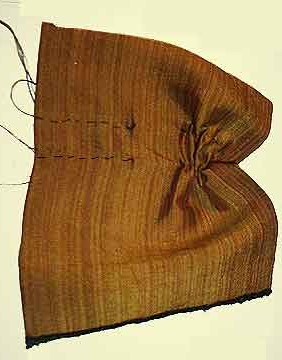
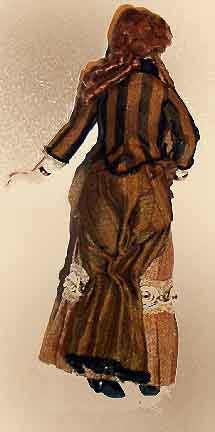
The skirt is a rectangle of box-pleated fabric gathered at the waist and stabilized by trim at the knee. To create the pleats, I tucked the fabric this way and that around coffee stirrers (any strips of even width would work), pressing as I went. Because I want the pleats to stay flat (rather than pulling open), the skirt has to be about 3" wide after pleating (hip measurement plus some fullness--experiment with flat fabric to gauge how much you want). Since pleating reduces the fabric width by 2/3ds, I started with 11" of fabric to leave a bit extra to play with. The pleats will are gathered into the waistband, with most of the fullness in back. The bustle and peplum will hide the pleat tops distorted by gathering. The skirt trim is 2 rows of fine lace dyed ecru, with the scallops matched to make ovals, with dyed bullion rose trim stetched a bit to center a rose in each oval. |
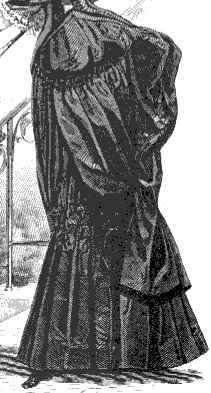
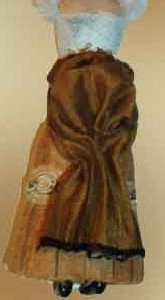
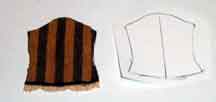
The entire bustle appears to be cut in one piece, and there's that interesting bit of what looks like bead-fringed black velvet separating top and bottom. |
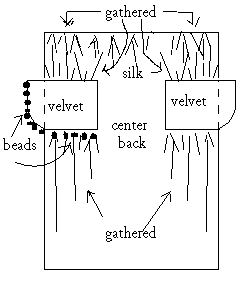
My plan:
Then gather the top edge and fasten it at the waist, leaving pouffs on each side and the ungathered middle of the back to stick out all funny like the picture. |
A B C |
A Two parallel rows of stitching gather the hips and will be covered with bits of velvet. A double row of ravelled bunka trims the hem (it looks like the original
was bound with velvet; that would be too bulky). The sides are folded
under and glued
C Velvet hip bits have been applied. They're trimmed with a double row of curly ravelled bunka accented with black no-hole beads. (Black on black again; you'd think I'd learn!) |
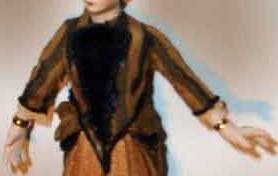
| I confess: my plan for the bustle didn't quite work, I think
because only the very softest of fabrics would do it in this scale.
The side puffs and drape are okay, but the back pouff came out too flat.
So I gathered both ends of a short tube of fabric and applied it on top of the bustle, hiding the bottom end in the gathers about halfway down. If I were doing something similar again, I'd make it in three parts;
the lower drape with the velvet hips, the hip puffs, and the back puff.
|
  |
|
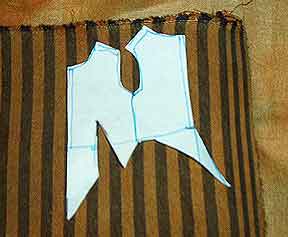
The points (front and back) were estimated and traced on paper pattern, fit over bustle and adjusted, then a new pattern was created (A). Why fit the bodice twice--wouldn't it be easier just to do it once,
after the bustle was on?
I decided I wanted the stripes to be vertical at center back, which would make them chevron on the back point. They also wound up straight on center front--I wasn't concerned about that because I plan to have lapels and things covering most of the front. Cut the pattern pieces (B). You can see it's fraying a bit; I don't usually fray check edges of fitted pieces when I'm gluing (you may need to if you're sewing). I've got a bit of extra ease and seam allowance that I can trim just before gluing down the fabric. Glue (or sew) center back seam and darts. Apply more ravelled bunka along bottom edge, with an extra row at each hip to echo the velvet turn-back on the picture (C). Apply back to doll first, overlapping front at shoulders (and sides,
if applicable)
|
A 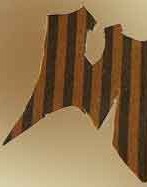 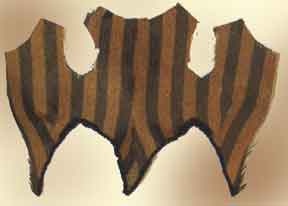
B C |
 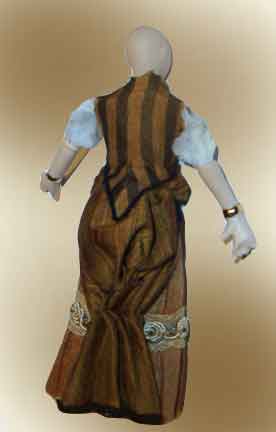 |
The bodice front and back. The front isn't really bulgy like
that.
I swear. I should have taped her upper arms when I did the body, but I did it just before adding the sleeves. |
|
Sleeves
Center stripe or pattern on the sleeve and make sure both match. I glued the same ecru lace as the skirt trim flat on the back of the sleeve hem, then glued bunka to the front of the hem. Wrap the sleeve around the arm and glue. While the glue is still wet, shove the hems back from forearms so sleeve has realistic "give" Glue to shoulders (trim off any frays first) or gather, tuck under the top edge, and glue. |
 |
 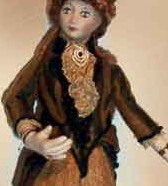 |
Lapels
are one triangle of velvet, edged with bunka and no-hole beads. Jabot is a double row of the ecru lace gathered down the middle, with a bullion rose at the throat. collar, pleated fabric and lace |
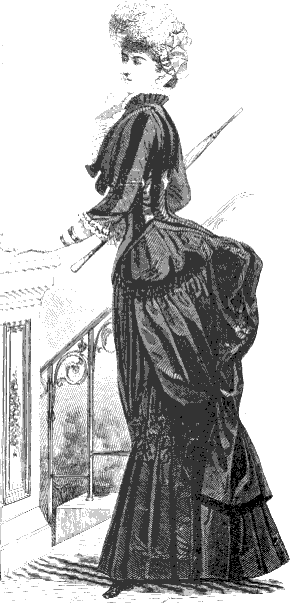 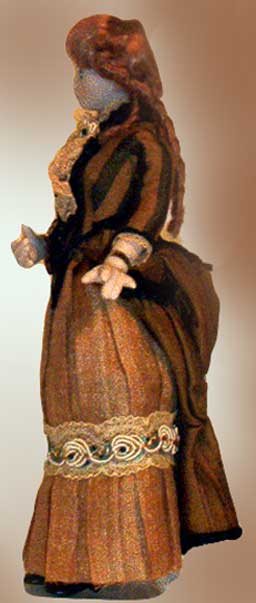
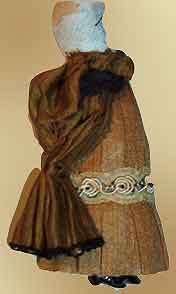
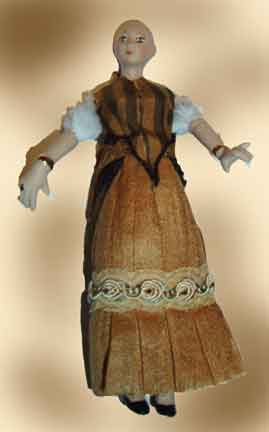
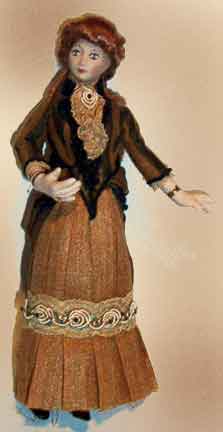
The original picture The finished doll |
  |
|
Part 1 |
Home |
questions, & suggestions! |
