
by Lee Menconi-Steiger
|
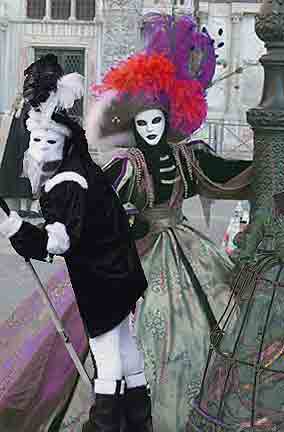
January 1, 2006 Have you ever had brain itch, when you get an idea in your head and try all sorts of things to work it out? I finally saw the movie DeLovely last night. There was a costume at the very beginning of the "Let's Misbehave" Venetian masquerade scene that I immediately wanted to make into a doll. I recognized it as the classic costume for a woman to wear to a Venetian masquerade. I sent the movie back to Netflix, then started doing some online research. Turns out, my familiarity with the costume came from somewhere in my past (probably in this life, rather than a previous one), and I haven't found anything similar online. After endless cogitation, reflexion, and brain-scratching, I've decided it was based on a picture in a book I used to have, and can almost bring it up in my mind's eye: Probably from the 1920s, and I think a black-and-white drawing or even a silhouette, it's a young woman in a calf- or ankle-length Rococo style gown. She has a small and simple white powdered wig with a black tricorne hat, and a black mask. Her bodice is black, with a pointy peplum over her full skirts. Erte', Baskt, Aubrey Beardsley, and Dover's Pictorial Archive clip art books all come to mind. I can just hear you saying, "So what? How does all this relate to minis?" Well, first I decided to make the doll, and then I got all excited about making Carnival costumes and decided to create a whole scene with several masked dolls. This is going to be my project for the new year, and I've decided to keep an online journal as an incentive to keep going--and as a forum to share my views on designing and building miniatures. |
|
|
There are several main steps when moving from idea to finished project: |
|
Jan 2 Woke up horribly early thinking about this scene. After tossing and turning for a while, got up and did some free associating. I wrote down every descriptive word that came up, then sorted it into my design categories (see my design page) Location: bridge over a canal in Venice Era: 1920s Style: exotic, glamorous, hedonistic, grotesque, decadent, rococo, baroque, seraglio; AMADEUS, Bakst, Beardsley, Erté Building materials/resources: pink marble, gray stone, terrazzo; feathers, lanterns, masks, pearls, diamonds, rubies, spangles, glitz, velvet, Silk, satin Condition: Confetti--new & mud-trod; gilt; gilded youth; upper class Atmosphere: Hijinx, Poses interact with architecture, Seraglio, pranks, Sex , Drunk, Jostle, Happy, Grotesque, Hedonistic, Decadent, Intrigue, Mystery, Festive , Heat Colors: black & white, jewel tones, silver, gold, gilt, scarlet Texture: stone, marble, terrazzo; ornately carved and gilded; silk, satin, velvet Line: horizontal and diagonals, with the curve of the bridge echoed by the curve of the proscenium, diamond shapes Balance: symmetrical and a bit formal Décor: Gondola, Diamond shapes, Maxfield Parrish twilight sky, Skull, Spangles, glitz, Terrazzo, Confetti--new & mud-trod Furnishings: bridge, steps, buildings, gondola Accessories: Lanternsbig round ones, portrait, Torches, turbaned Moorish torch bearers Repetition: Masks/faces. Scarlet and ruby accents, diamond shapes, black and white, gold leaf Inhabitants:Bird beak, Moor, Cat mask, Coquette, MASKS, Monk, Monkey, Robes, swan headdress, Tricorne Hats, Poses interact with architecture, Drunk, Upper class, gilded Youth, Harlequin, Skull, turbaned Moorish torch bearers So my working title is now The Terazzo Palazzo, and I combined a lot of the ideas above into this description: A fairly shallow wall-hung setting portrays the front of a pale gray stone Rococo palazzo. Steps leading up from a gondola are filled with beautiful, young, rich people in exotic costume. Blackamoor torches flank the steps; round, brilliantly colored Chinese lanterns cascade somewhere or other. The sky is Maxfield Parrish twilight. Terrazzo on steps and landing and maybe front of building portrays fantastic birds and beasts. Black and white harlequin banners float in the breeze off the canal. |
Next I researched several of the brainstorming ideas online, which turned up several new ideas to add to my list and concept. |
|
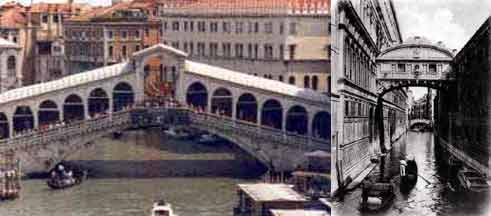
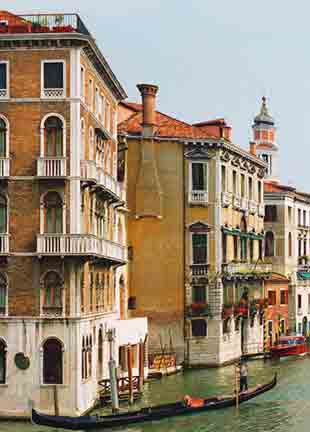
Jan. 3 Looking through my research, it appears that palazzos don't generally have steps down to the water, just a landing. I like the idea of steps, though; it would let me display dolls at different levels and make the scene more interesting. The canals are crossed by wonderful arched wedding-cake bridges, so the Terazzo Palazzo is going to move into the background and a scaled-down version of the Ponti Rialto (above) will take center stage. I like the way the Bridge of Sighs (right) spans two buildings, and it's much smaller than the Rialto. But it's so closed in the dolls wouldn't show, so I'll try to create a hybrid of the two. And I'll move it down closer to the water so I can include a gondola. |
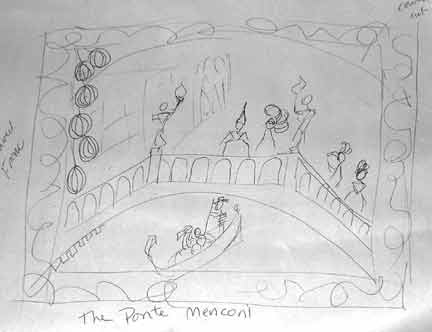 Revisions to description: Masquers parade on the Ponte Menconi before a backdrop of palazzos. A gondola beneath the bridge (could probably simplify the gondolier, just show him from behind). Twilight sky behind printed palaces pasted on foamcore. Gilded youth, fanciful costumes, yada yada. |
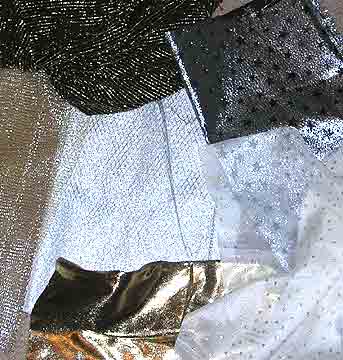 |
Jan. 4 I headed into town to visit three thrift stores and four fabric stores looking for interesting textiles. The thrift stores were rather a bust; mostly casual cotton clothing, some of it rather shabby. I found one silk blouse, but couldn't bring myself to pay $8 for it. I got some silk and a few glitzy fabrics at the biggest fabric store in town. There's one more I haven't checked for silks; maybe I'll get lucky there. I've also been ordering fabric and books and supplies online; I should be getting packages every day for the next few weeks--and a hefty charge bill at the end of the month. I've ordered some dolls (I have only one here, and I'm not sure he's right for this project), so have to wait on costuming until they arrive. There's a place in town that has some nice hand-carved frames from Indonesia that might work for the box, but I haven't had a chance to go measure them. I got some foamcore and paint today and tracked down some big sheets of newsprint so I can start doing a mock-up of the bridge and buildings. I need to find a copy of Amadeus, that should have some fun costume ideas. I'm looking forward to making masks; one idea is to print out a mask, cut it out, dampen and shape over a doll's face, dry and decorate. I'll let you know how that goes! |
|
Jan 5-8 Since I'd like to form the masks over doll faces, I asked on the MSAT Mini Doll list if anyone had heads they couldn't use, and offered to trade. Three generous dollmakers responded; Gisele would like tropical flowers in exchange, and Lucie wants a cat mask. Bobbi is including a few heads gratis with the doll I won from her at the New Years Day Bash on the list, so I should be in business soon. Am considering the idea of limiting the colors to black, white, gray, silver, gold, and scarlet. Might be fabulous, or might be boring. Perhaps I'll limit the scene to neutrals and use brilliant colors on the dolls. Found a transformer that will power the scene (did you know you can use transformers from rechargeable appliances? Make sure it's 12v and the right amount of amperage--each bulb uses about 60 milliamps--then cut off the plug and hardwire the lights or a mini power strip onto it.) |
|
Jan 9. I did some sketches, trying to work out what the final size should be. It kept getting bigger and bigger! I wound up making paper cutouts in 1/2" scale of various pieces to save re-drawing them each time. At the bottom are the gondola and gondolier, then the bridge with people standing on it, and the torch-bearing statues atop the rail, plus some open space above, so it's already more than 15" high. I want it wider than high, so it looks like it's going to be about two feet wide. I originally thought the entire scene would be about 18" wide; I may have to mount it on brackets like a shelf instead of like a picture. I think I'll make the steps extra wide, so it's easy to stand the dolls on them; the steps themselves won't show, so nobody will know |
 1/2" scale sketch |
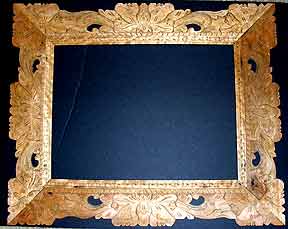 I got a beautiful frame--hand carved and from Indonesia, as hoped--for only $15. I couldn't buy molding that cheap! It's unfinished wood; I plan to gold leaf and antique it. The frame opening is only 12" x 16" but the wooden part of the frame is about 3-1/2" wide, so I can make the box about 2" bigger all around, or almost 16" x 20". I like to get in and rearrange things after a scene is "finished" so I think I'm going to build an open-back wooden box on the back of the frame, and make a foamcore box that slides into it. That way the scene can have a glass front and still be easy to change. |
Steps to complete the scene |
|
Jan 12 I had sculpted a cat face on one of the porcelain doll heads in air-dry clay, and today started the cat mask by alternating several layers of tissue paper (it's thin and molds easily to the face) with thinned glue. While that was drying, I took an online class on wigging from MiniDoll University, and am practicing the lessons. Good thing Lucie's doll heads arrived yesterday, it gives me scalps to wig! I have the viscose hair and tacky glue, but am lacking pretty much everything else used in the class--fabric softener, plant mister, size 00 knitting needles, a hair dryer--so am substituting (in order) hair conditioner, damp fingers, size 2 knitting needles, and air plus patience. Seems to be working! 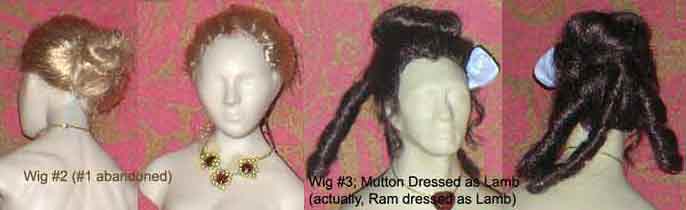 |
|
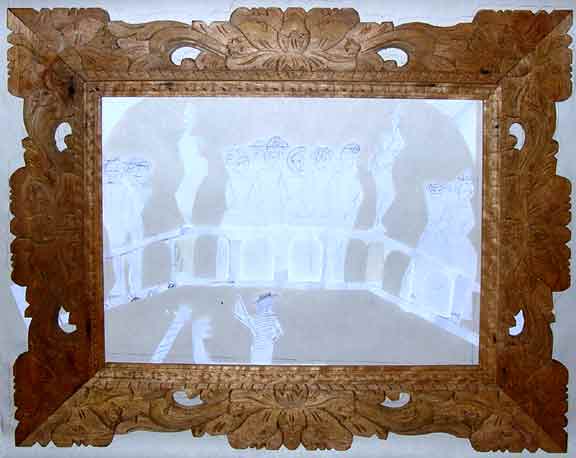
Friday the 13th Lucky me; the heads from Gisele came in today; a wonderful collection of pretty ladies and characters. The masks shape most dramatically over big noses and sharp features, and it's easiest to work with heads connected to torsos or glued to scraps of cardboard. I also created paper cutouts in 1" scale to try them out with the frame. Since the frame is smaller than hoped, I scaled down what I could; the torchbearers are shorter, there's less room above them, and the poor gondolier is hardly visible. Since I can make the box larger than the opening, when I set the pieces back from the frame, more will be visible. That's the theory, anyway! |
|
I've been wanting to do a fish mask, and was picturing a goldfish. We went snorkeling this afternoon, so I considered each wildly colorful tropical fish I saw as a candidate for a mask. None of them seemed right, and I formed a theory that tropical fish weren't very common in Venice in the 1920s. This led to further contemplation (floating around face down in the water makes for wonderful contemplation) and I decided that I want a "timeless" feel to the scene, rather than lock it in to the 1920s. But if I did want to make it look 1920s, I'd add some strong Art Deco motifs. So anyway, I'm going with a goldfish/carp sort of look; they've been well-known for a long time and invoke a sort of exotic oriental feel that will fit in well. And oriental stuff was popular in the 1920s, too--Mah Jong, kimonos, and I'll bet goldfish! Masks in progress: a big nose jester, a second cat face (this time I used a doll with a rounder face), and a cool devil with pointy eyebrows and built-in beard. Also shown: 3 unpainted masks (jester, il dottore, moon lady); 3 nearly finished masks (2 "blank" faces and one commedia mask), and the finished cat mask with stick and ribbons. I'll have room for about 6 or so dolls, but it looks like I'm going to have dozens of masks to choose from. 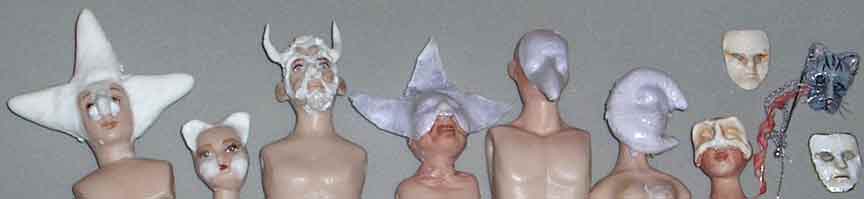
|
|
There are several types of projects that make up this scene: DOLLS, including costumes, wigs, and masks SCENERY, including the bridge, buildings, canal, gondola, and the background (another recent idea, I'll make a curved backdrop painted like the sky; it solves the problem of how to make the transition from sides to back of the box. In theater, it's called a cylcorama) CONTAINER, including the frame, wooden outer box, foamcore inner box, and whatever I figure out to hang it on the wall. Speaking of which I saw a possible item for this the other day; it was a wall-mounting shelf unit with an ornate faux-carved base. It was too narrow, only about 6" deep, but had a great look. I wonder if I should go back for it and figure a way to make it work. |
|
Jan 17-20 Goodies arrived in the mail: a wonderful fairy kit and more doll heads from Bobbi Hargett, and all three of Jamie Carrington's dollmaking videos, plus some clay and sculpting tools. If you'll excuse me, I'm going to go get creative! 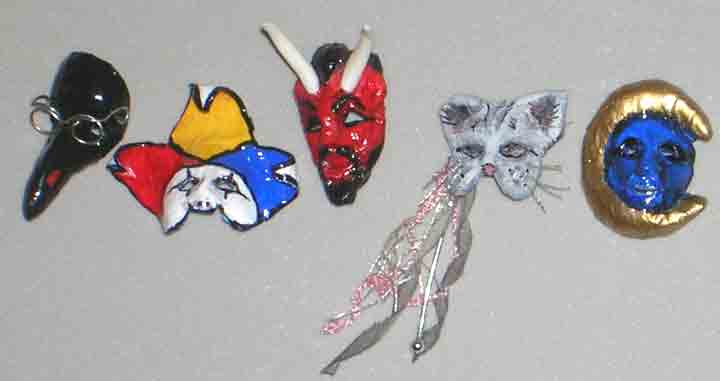 Finished some masks: il dottore, a zany, devil, cat (this one is for Lucie, a trade for the doll heads), and a moon lady that looks kinda creepy |
|
Jan 21-31 Raise your hand if you think I'm doing so many masks because I'm afraid of starting the box. Quite a forest of hands out there, you guys really know your stuff! I built the box in foamcore, 9" deep. It was ginormous, so I cut it down to 7" deep. That means the bridge will be about 5" wide. I did go back and get the wall-mounted shelf. It looks like carved wood but is lightweight styrene or something like that. It's only 5" deep so I'm going to have to attach a wider shelf on top. It's about the same width as the frame, so that works out great. 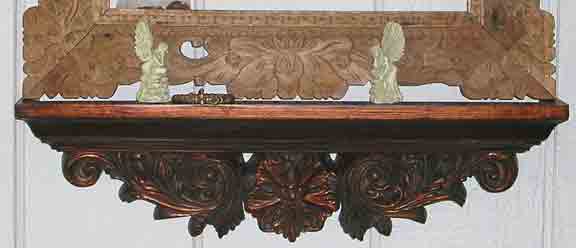 A a couple of other projects have been taking up my time; a robe for my husband and a mini Valentine swap project that was inspired by this big project; the mask is removable, so it can be used in a mini scene. The Valentine is layered, with the lady, banner, and fancy corners 1/4" in front of the drapery background. Since I used foamcore as spacer, the mask is protected for mailing. 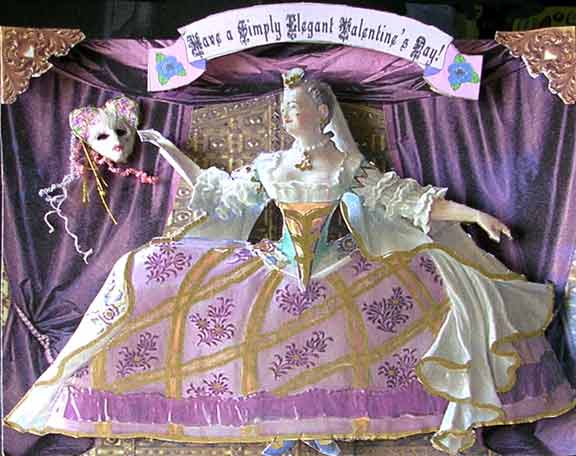 * * 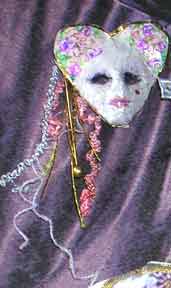 |
|
This page was getting way too long and slow to load, so I've divided it up into months. February March Why haven't you been working on this, Lee? |
|
|
questions, suggestions! remove the *don'tspam* |
journal |
tutorial |